Installing IPKISS
System Requirements
Supported Operating Systems:
IPKISS is tested and supported on the following platforms:
Windows: Windows 10
Linux: Centos 6.6+ (newer recommended). Ubuntu and other linux distributions are not explicitely tested, but in general work fine.
Hardware Requirements:
Ram Memory:
Linux: 4GB+ recommended
Windows: 8GB+ recommended
Disk Space: 4.5GB free disk space required.
IPKISS Link for Siemens EDA
The link with Siemens EDA requires L-Edit 2019.2 or newer, only windows based installations are supported.
IPKISS Link for Ansys Lumerical
Lumerical version 2020a or newer is required.
IPKISS Link for Dassault Systèmes Simulia
CST Studio Suite ® version 2019 or newer is required.
Installing IPKISS on Windows
Downloading the software
To download the latest version of the IPKISS Photonics Design Platform, sign in or request an account on the Luceda customer portal. You will find a download link in your personal account page.
Installing the software
After opening the executable installer, please follow the steps of the installation program. The installation will proceed in two steps: it first extracts all files to the installation folder, and then sets up the initial ipkiss3 environment. The installation can take up to 10-15 minutes.
Note
The installer takes a while to start. Please be patient while the installer is working in the background. You may receive the message “Windows protected your PC”. If this happens, please click More info and then press Run anyway.
Note
Please don’t click inside the terminal while it is installing. This would cause the installation to pause due to how the Windows Terminal works. If the windows terminal does get paused in this way, press any key to resume the installation.
After the installation, you can choose to launch Luceda Control Center. Alternatively, you can find the control center in your start menu, as shown below:
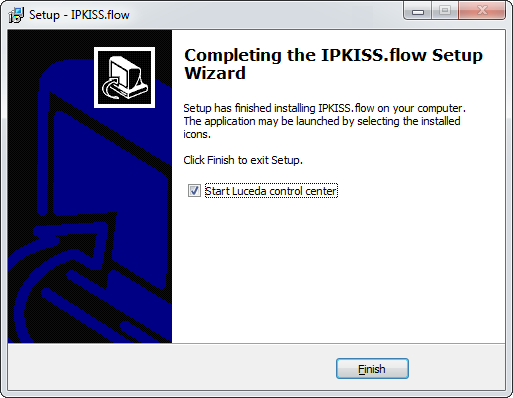
In the final step of the installer, you can choose to start Luceda Control Center.
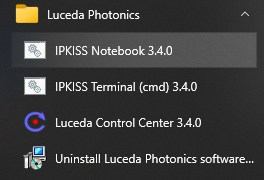
You can also start the Luceda Control Center from the start menu.
License types
There are two types of licenses: node-locked and floating licenses.
Node-locked license: this type of license is tied to a specific computer. This means that it cannot be used on other computers. The license is fully described by the license file which needs to be installed on the computer to which it is locked. A node-locked license is locked to a host id, which is the serial number of a hardware part of the computer (disk or network card).
Floating license: in this case, there is no restriction on which computer you can run the software, but you are limited to a certain number of licenses. Floating licenses are hosted through a license server and hence requires some setup, which may require the assistance of your computer or network administrator. Every computer on which you want to use the software needs a license file installed, which will inquire this license server. To set up this type of license, please refer to setting up the reprise license server.
Obtaining and installing a license
A license file can be obtained through Luceda. Licenses can be of two types and require the following information:
For node-locked licenses, we will need the host id of the machine that will run the software.
For floating licenses, we require the host id of the license server. Please refer to setting up the reprise license server.
To find the hostid of your computer, please open the Luceda Control Center, go to the tab, and look for “The hostid beloning to this computer is”. Once you have this information, please send it to license@lucedaphotonics.com, and we will generate a valid license for you.
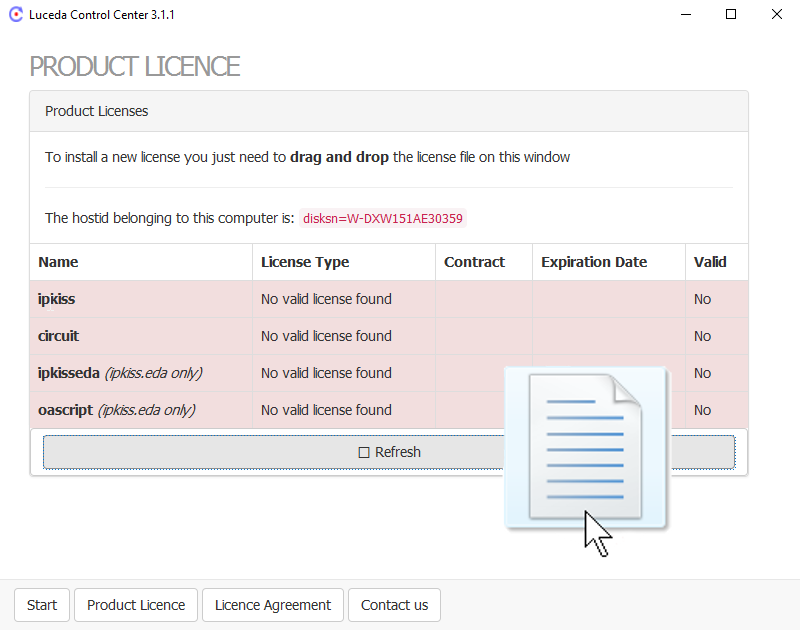
Product License tab. It shows the hostid of this computer. You can drag and drop a license file in this window to install a license.
To install the license file just drag and drop it onto the Product License screen.
This will copy your license file to C:\luceda\ipkiss_xyz\python\envs\ipkiss3, which allows IPKISS to discover your license.
In case you’re using a license server, you’ll first have to make sure that the first line in the license file contains the URL to the server that hosts the license. For example, the first line of the license may look like this:
HOST mylicenseserver.mycompany.com 1021486dc38f 5053
It means:
HOST: indicates the license server information.
mylicenseserver.mycompany.com: the location to the server. You have to modify this so it points to the correct server.
1021486dc38f: the hostid of the server. This should already be set up properly and should not be modified.
5053: the port to connect to (5053 is the default port and typically doesn’t need to be modified).
License Troubleshooting
We will assist you if you are experiencing difficulties with your license. To help us find the cause, we kindly ask you to download our Diagnostics Tool and follow the instructions at http://support.lucedaphotonics.com/a/solutions/articles/1000275092-diagnostics-tool
Luceda Control Center
Luceda Control Center is the central location to manage your installation, consult documentation and samples, and so on. It can be launched after installing the software, or by selecting the application from the start menu as explained in the previous step (currently, Luceda Control Center only works on Windows). Below we show the different options offered by Luceda Control Center:
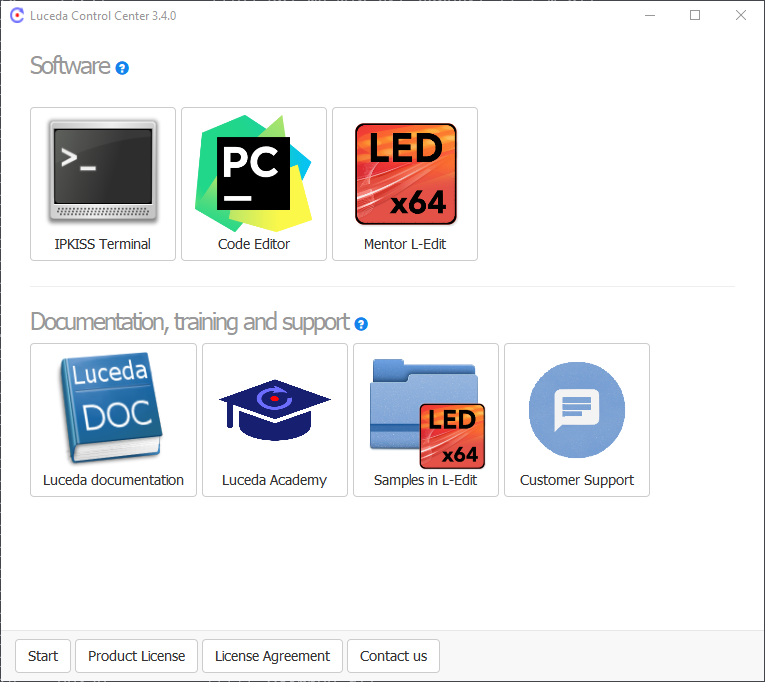
Luceda Control Center is the main application window, from which you can manage your installation and get direct access to the documentation and samples.
The Start tab contains starting points for the following categories:
Software
“IPKISS terminal”: This start a terminal with the IPKISS environment preconfigured. From this terminal, you can perform a set of tasks, such as installing additional packages, starting Python notebooks, etc.
“Code Editor”: This start PyCharm. It opens the last project you were working on. If you haven’t started it before, it will ask to create a new project.
“Mentor L-Edit”: This starts L-Edit preconfigured for IPKISS usage.
Documentation, training and support
“Luceda documentation”: This opens an off-line copy of our documentation. Alternatively, you can visit the on-line documentation.
“Luceda Academy”: This opens an online training hub, where you can find the necessary resources to get started with IPKISS and improve your designing skills using the Luceda ecosystem.
“Samples in L-Edit”: This opens the IPKISS Link for Siemens EDA samples that are run from L-Edit.
“Customer support”: This opens a web browser to our online support channel.
Alternatively, you can e-mail support@lucedaphotonics.com, which will automatically create an account for you if you don’t have one yet.
The User license tab contains the Luceda Photonics license. Contact us tab contains general information about Luceda Photonics and explains how to get support.
Installing a code editor
When using IPKISS, you will often write Python code to build new PCells, create circuits, run simulations etc. To make this efficient, it is important to use a good code editor with coding assistance, such as code completion, debugging, and so on. Having a good code editor in general can increase productivity while working with IPKISS. Below is a list of editors that have been used in the past in combination with IPKISS. Our main supported tool is PyCharm.
PyCharm (free/commercial licenses): The recommended editor, with code completion, debugging, etc. Please check out the set up IPKISS in PyCharm.
Wing IDE (commercial, also a free lightweight version): It has all the features needed to efficiently use IPKISS. It is fast and stable, and works on Linux / Mac / Windows. See guide to set up Wing IDE for IPKISS.
PyDev (free): It is a Python IDE for Eclipse. It has good project management, good code completion and debugging capabilities.
Sublime Text Editor (unregistered/registered version): It is very fast and has many advanced text editing capabilities. It takes a bit more time to set it up properly, but very extensible.
Spyder (free): A simple IDE written in Python and focused on the scientific community.
Installing IPKISS on Linux
Running Ipkiss on Linux is supported using Anaconda. Anaconda is a Python distribution that targets scientific users. It makes working with binary packages much easier and allows to have different independent environments next to one another. It is developed and maintained by Continuum Analytics. For more information visit their website: http://continuum.io/.
This document explains how to complete a basic anaconda installation and how to install Ipkiss on it.
Installing miniconda on Linux
Miniconda is a minimal version of the Anaconda distribution, but it contains all the elements to install and run IPKISS. If you have already installed anaconda or miniconda you can skip this part and reuse your existing installation.
1 ) Download the 64 bit version of the python2.7 version of the miniconda installer, by executing the following command:
wget -O miniconda.sh https://repo.anaconda.com/miniconda/Miniconda3-py38_4.9.2-Linux-x86_64.sh
Or you can choose to download the installer by copy/pasting the link in your browser.
2 ) Execute the miniconda installer
The miniconda installer is a simple bash script, execute it using the following command:
bash ./miniconda.sh
We assume you have sufficient privileges to complete the installation. If this is not the case, you’ll need to contact your system administrator.
The install script will present you the following questions:
Do you accept the license agreement?
Which path do you want to install into? The default is
$HOME/miniconda3. If you prefer, you can specify another location here.Do you wish to prepend the Miniconda install location to the PATH environmental variable?
Question 3 will make sure that you have access to all the necessary tools when you launch a terminal. If you don’t have another anaconda distribution installed, we recommend that you execute this step. When you’re already using Python on your machine, you might want to be bit more cautious, to make sure that you don’t override the old configuration.
When the install script successfully finished, you can continue with installing IPKISS.
Installing IPKISS packages
The Anaconda distribution is built around ‘environments’. When you create a new environment, you can install packages into this environment without changing other environments. This way a new version of a package can exist next to an old version. In this section we explain how to install Ipkiss and its dependencies to a dedicated environment.
First ensure that you are using an anaconda or miniconda installation. If you installed miniconda according to the instructions above, and are still in the same terminal window, then first load anaconda:
source ~/.bashrc
If you now run which python, then you should get ~/miniconda3/bin/python or similar.
Then, download the .zip package we sent you upon software deliver. Now we can start the installation of IPKISS by executing the following command:
cd ~/Downloads # We assume you downloaded the packages here.
python ipkiss-xyz-packages-linux64.zip
When the command exits you should have a working Ipkiss installation. You can activate it by running the following command:
conda activate ipkiss3
If you get the following error message:
CommandNotFoundError: Your shell has not been properly configured to use 'conda activate'.
To initialize your shell, run

    $ conda init <SHELL_NAME>
Execute first conda init bash (assuming you’re using the bash shell), restart your shell and execute conda activate ipkiss3 again.
Installing the license on Linux
Upon receiving the software, you will also receive a license key (with the .lic extension).
In order for IPKISS to recognize the key, it has to be placed into the folder of your Python environment.
For example, when you installed IPKISS to the default location, you need to put the license key into the $HOME/miniconda/envs/ipkiss3 folder.
Alternatively you can install the license by dragging and dropping the license file on the Luceda control center, as explained in the instructions for windows.
After activating your ipkiss3 environment, you can launch the control center by invoking the ipkontrol command from the command line.
Please check the where to go next section to find out where the documentation and samples can be found.
Using a floating license
Hosting the license server
Before being able to use the floating server, your license administrator needs to install the license server. The instructions are found here: setting up the reprise license server.
Configure your floating license
As explained in Installing the license, the floating license also needs to be placed in the Python environment folder.
For Windows, it is at C:\luceda\ipkiss_xyz\ for example; for Linux, it is at $HOME/miniconda/envs/ipkiss3.
Additionally, please make sure the location of the license server is set correctly to the URL of the server that hosts the license. To prevent interference with the license server or RLM’s web server, it is recommended to set the ISV server port to something other than 5053 or 5054.
You can find these configuration settings in your ‘.lic’ file under the title “location of the license server”. For example:
# Location of the license server
HOST mylicenseserver.mycompany.com 1021486dc38f 5053
ISV luceda port=5055
Remember to replace mylicenseserver.mycompany.com with the server address.
An alternative approach is to set the luceda_LICENSE environment variable.
Certainly when you use multiple environments, this can be more convenient than using a file.
For example on windows you can execute the following to set the environment variable.
setx luceda_LICENSE 5053@mylicenseserver.com
on Linux you could put the following in your .bashrc file:
export luceda_LICENSE=5053@mylicenseserver.com
Installing a GDSII viewer
KLayout is an open source viewer and editor for GDSII and OASIS files. We found it to be an easy-to-use and very accurate tool for viewing GDSII files. It runs on Windows, MacOS and various Linux distributions.
To install KLayout, please go to http://www.klayout.de/ to download a copy.
Using KLayout, it is possible to open multiple files at once, overlay multiple files on the same screen, do simple edits, perform boolean operations, and so forth.
Design kits may come with a layer properties file .lyp which sets the layer names and drawing colors for easier viewing.
This file can be loaded through .
After installing KLayout, you can open GDS files from your file manager, or directly from within Wing IDE using the Open in External Viewer button as shown in the figure.
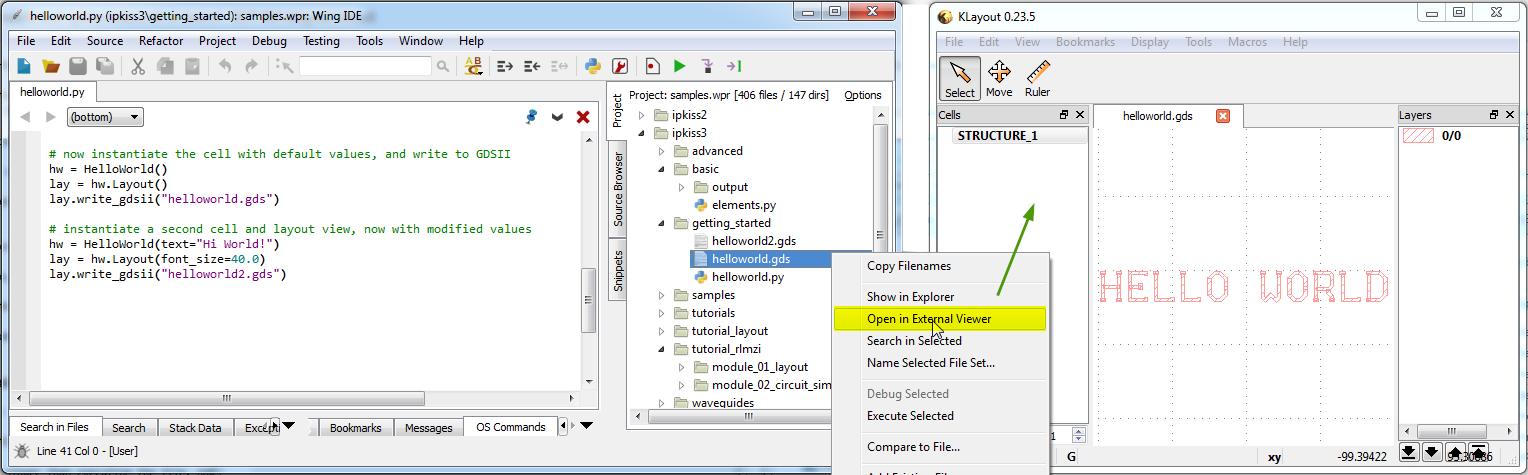
Open a GDS file from Wing IDE using the Open in External Viewer button.
Where to go next
After installation, the following contents can further help you getting started with IPKISS.
samples:
Windows: from Luceda Control Center you can access the samples folder (which is available in the
%USERPROFILE%\luceda\samples\ipkiss390directory in your home folder). In this folder there is a Wing project file, which brings you to the Wing IDE editor with the samples inside the project.Linux: after executing setup-samples on the command line, the samples will be available in your home folder in
~/luceda/samples/ipkiss390.
documentation:
Windows: you can access the documentation by pressing the Luceda documentation button from Luceda Control Center.
Linux: To run the documentation, activate the environment and run luceda-doc:
source activate ipkiss3
luceda-doc
This will start a daemon, hosting the documentation through a web server. It will launch the default browser to show the documentation.
In the documentation, you can find further links to:
Tutorials: the tutorials are a set of step-by-step guides, from beginner to expert IPKISS usage, and covering a wide variety of topics from layout to circuit simulation.
Guides: read about advanced guides focused onto several topics of IPKISS (i.e., layout, circuit simulation, netlists, and so on).
Logging: read about the different IPKISS logging levels (which are useful to find out which version of IPKISS you are using or to enable several debugging options).
Managing virtual environments: use virtual environments when you need additional python packages for advanced development work.
For IPKISS Link for Siemens EDA Users
The following section is relevant to IPKISS Link for Siemens EDA users.
Installing IPKISS Link for Siemens EDA
In order to run IPKISS Link for Siemens EDA, you will need both the installation and the license from Mentor Graphics for L-Edit and a license from Luceda for IPKISS.
For IPKISS installation and license, please refer to the beginning of this page: Installing IPKISS
For L-Edit installation and license, please refer to the Mentor Graphics sales channel or through https://www.mentor.com/tannereda/ams-ic. Before you can get started using the IPKISS integration with L-Edit, you’ll need to obtain copy of Tanner L-Edit from Mentor Graphics. You must use L-Edit version 2019 or newer. If you’re unsure whether your version of L-Edit is compatible with IPKISS, feel free to ask us. We’ll be glad to help you.
Verify your installation
After you’ve installed Tanner L-Edit, IPKISS and your license, you should be ready to start creating designs. You can quickly check that everything is correctly set up by creating a test design. IPKISS contains a pre-made library called ‘demolib’. You can use it to test your installation.
Start Tanner L-Edit.
Select and open the demo design project of demolib. You can find it at
%USERPROFILE%\luceda\samples\ipkiss390.In the command line window of L-Edit, you wil see a message saying that Luceda macros have been loaded.
Create a new design by pressing the shortcut n.
Instantiate a component by dragging it onto your new design.
You should now see the layout of your component. Note that it may take a while to load for the first time. Subsequent calls will run much faster once IPKISS is loaded.
Environment variables used by IPKISS
The following environment variables are used by IPKISS:
luceda_LICENSE: Folder to where license files are stored, orport@address.to.license.server. See configuring floating license. This variable is case-sensitive on Linux.LUCEDA_LOG_LEVEL: Logging in IPKISS. Empty or ERROR, WARN, INFO, DEBUG, TRACE.LUCEDA_LOG_DIR: Directory where log files for IPKISS are stored. When not set,%APPDATA%\luceda\logs(typicallyC:\users\yourusername\AppData\Roaming\luceda\logs) on Windows or$HOME/.luceda/logson Linux will be used.LUCEDA_FILE_LOG_LEVEL: Logging level for the file logs. Default isDEBUG. Possible values:ERROR(least details),WARNING,INFO,DEBUG,TRACE(most details).LUCEDA_PYEVAL: Path to the python interpreter which is used to run PCell evaluations from external tools. When using OpenAccess databases (e.g. in L-Edit or oascript), the Luceda OpenAccess PCell evaluator uses this variable to run the PCell evaluation in IPKISS. This variable is set into the user environment variables automatically when installing IPKISS (unless if you deselected the option). Change this value to another pythonw.exe if you want to change which Python interpreter is used.LUCEDA_EVAL_OPTS: This variable is only for use with IPKISS Link for Siemens EDA to set options related to the Luceda evaluator. This is an advanced setting, aimed at users that need the flexibility.The variable controls how processes are launched. The value can be either SP or PL (single-process / process-per-library). If no value is provided, the default is to use SP (single-process). The IPKISS < 3.4 behavior is to do a process per library. SP has the advantage to mimic better the default IPKISS behavior where libraries can share cells.